

A cracked cylinder head can wreak havoc on your engine’s performance and lead to costly repairs if left undetected. This critical component serves as the seal between your engine block and internal combustion chamber, making any damage potentially devastating to your vehicle’s overall function.
We’ve compiled this comprehensive guide to help you identify the telltale signs of a cracked cylinder head before it becomes a major issue. From bubbling coolant to mysterious white smoke and unexplained overheating, these symptoms shouldn’t be ignored. With our step-by-step testing methods, you’ll be able to diagnose this problem accurately without necessarily visiting a mechanic first.
Understanding Cylinder Head Cracks
Cylinder head cracks develop when this vital engine component sustains damage beyond its structural limits. These fractures compromise the seal between the cylinder head and engine block, allowing fluids to mix or escape and potentially causing catastrophic engine failure if left untreated.
Common Causes of Cylinder Head Damage
Overheating stands as the primary culprit behind cylinder head cracks, occurring when coolant levels drop too low or when the cooling system fails. Extreme temperature fluctuations create thermal stress as the metal repeatedly expands and contracts, eventually forming hairline fractures that grow larger over time. Improper torquing during installation puts uneven pressure on the cylinder head, creating weak points vulnerable to cracking. Pre-ignition and detonation (engine knock) generate excessive pressure spikes in the combustion chamber, hammering against the cylinder head. Manufacturing defects like improper casting, material impurities, or design flaws can create inherent weaknesses. Poor maintenance practices, including neglecting coolant changes or ignoring warning signs, accelerate deterioration of the cylinder head’s integrity.
Signs That Suggest a Cracked Cylinder Head
White or gray exhaust smoke appears when coolant leaks into combustion chambers through the crack and burns with the fuel. Bubbling in the radiator or coolant reservoir indicates combustion gases escaping through the crack into the cooling system. Milky oil or oil with a frothy consistency on the dipstick reveals coolant mixing with engine oil through the damaged cylinder head. Unexplained coolant loss occurs as fluid escapes through cracks without visible external leaks. Engine overheating happens repeatedly even though a functioning cooling system. Cylinders display uneven compression readings during diagnostic tests due to pressure escaping through the crack. Failed pressure tests confirm suspicions when the cooling system can’t maintain pressure or when bubbles appear in the coolant. Sweet-smelling exhaust fumes emerge as glycol from the coolant burns in the combustion process. Poor engine performance, including rough idling, misfiring, and decreased power output, results from compromised cylinder pressure and improper air-fuel mixture.
Tools Needed for Cylinder Head Testing
Testing for a cracked cylinder head requires exact tools ranging from basic inspection equipment to more advanced diagnostic instruments. These tools help identify issues that might otherwise remain hidden until severe engine damage occurs.
Basic Inspection Equipment
Visual inspection tools form the foundation of cylinder head testing. A high-powered flashlight illuminates hard-to-see areas where cracks might be hiding. Disposable gloves protect your hands while examining potentially hot or contaminated engine parts. A cooling system pressure tester connects to your radiator and pressurizes the system, revealing leaks that indicate cracks. Many mechanics also use a clear container for collecting and examining coolant for signs of contamination. Temperature guns accurately measure hot spots that might point to problematic areas in the cylinder head. DIY enthusiasts can create a homemade pressure tester by connecting a bicycle pump to the water jacket of a removed cylinder head submerged in water—bubbles will form at crack locations.
Advanced Diagnostic Tools
Professional-grade equipment provides more definitive results when basic testing methods are inconclusive. Dye penetrant test kits (often called Zyglo testing) include special dyes that seep into cracks and become visible under UV light. Magnaflux or Magniflex spot check kits detect cracks in ferrous metals using magnetic fields and colored powder. For aluminum cylinder heads, specialized non-ferrous metal testing kits produce reliable results. Chemical spray tests like the Chemtools CT-WCFF Metal Crack Detection Kit highlight cracks through color contrast. Compression testers and leak-down testers measure pressure retention in cylinders, revealing internal cracks that allow combustion gases to escape. Professional mechanics often use borescopes—small cameras mounted on flexible cables—to visually inspect internal areas of the cylinder head without complete disassembly.
Visual Inspection Techniques
Visual inspection serves as the first line of defense when testing for a cracked cylinder head. Careful examination can reveal telltale signs of damage before more comprehensive testing methods are needed.
Initial Inspection
Start with a thorough visual examination of the cylinder head for any obvious damage. Focus on the areas around the combustion chambers, valve seats, and the spaces between injector bores and valves—these locations frequently develop cracks. Look for any warping, discoloration, or visible fractures that might indicate structural compromise. A high-powered flashlight helps illuminate hard-to-see areas where hairline cracks might be hiding. Pay attention to any unusual patterns or marks on the metal surface, as these can point to underlying issues.
Surface Examination Process
The surface examination process employs specialized testing methods to reveal cracks invisible to the naked eye. Dye penetrant testing offers a reliable non-destructive approach—apply the colored dye to the cylinder head surface and allow it to seep into any existing cracks. After cleaning the surface, apply a developer which draws the dye out of the cracks, making them visible under UV light. Chemical spray tests function similarly, using reactive chemicals and powders to highlight surface fractures effectively. These methods prove particularly valuable for DIY mechanics lacking access to professional equipment but still wanting a thorough assessment of their cylinder head’s condition.
What to Look For
When inspecting for cracks, exact indicators demand attention. Monitor for pressure drops during cooling system pressure tests—any decrease suggests a leak potentially caused by a cracked cylinder head. Check thoroughly for coolant leaks around the cylinder head gasket and mating surfaces. Examine the areas between injector bores and valves with extra care, as these high-stress zones commonly develop fractures. Surface discoloration or warping signals potential overheating damage, which frequently precedes cracking. The head gasket itself offers clues—damage to the fire ring (the steel ring sealing the combustion chamber) often indicates cylinder head problems. These visual cues, combined with systematic testing, help determine if a cylinder head has developed cracks before catastrophic failure occurs.
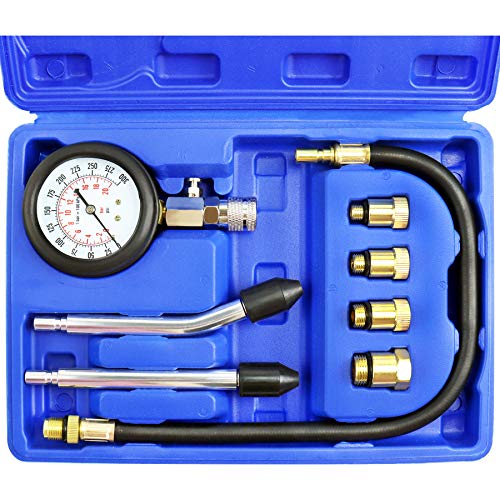
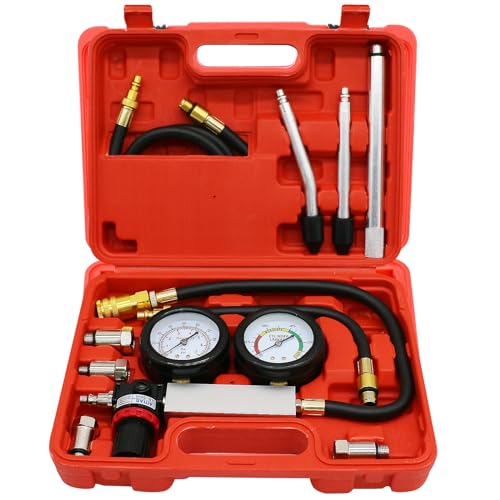
Performing a Pressure Test
Pressure testing is the most reliable method to detect cracks in a cylinder head. This diagnostic technique uses compressed air or gas to reveal hidden flaws that might escape visual inspection alone.
Setting Up the Cylinder Head Pressure Test
Proper preparation is essential before conducting a cylinder head pressure test. First, clean the cylinder head thoroughly, removing all debris that could interfere with accurate results. Remove valves, spark plugs, and any components that might block access to the combustion chambers.
Next, seal the combustion chambers using a specialized pressure test kit that fits securely over these areas. The test fixture creates an airtight seal, allowing for pressurization of the internal passages. Connect the fixture to a compressed air or nitrogen source regulated between 1000-1500 psi for optimal accuracy, as standard shop air often lacks sufficient pressure for definitive results.
Once the system is connected, gradually increase the pressure while monitoring the gauge. The high-pressure environment forces air through any cracks or defects, making them detectable through various means. During this process, pay close attention to coolant passages and listen carefully for any hissing sounds that might indicate escaping air.
Interpreting Pressure Test Results
Accurate interpretation of pressure test results requires knowledge of exact indicators. Air bubbles appearing in the cooling system or radiator provide clear evidence of a leak, pointing to either a cracked head or blown head gasket. These bubbles form when pressurized air escapes through cracks and enters the cooling circuit.
Distinct hissing sounds during the test reveal air escaping through fractures, even when bubbles aren’t visible. The location of these sounds can help pinpoint the exact position of cracks in the cylinder head. Monitor the pressure gauge closely throughout the test—a important pressure drop over time confirms the presence of a leak somewhere in the system.
For comprehensive results, combine pressure testing with other diagnostic methods. Standard pressure testing might miss surface cracks that don’t connect to water passages, necessitating additional procedures like dye penetrant testing (Zyglo or Magnaflux). A leak-down test can verify pressure test findings by measuring pressure drop rates within the cylinders.
Remember that disassembly and visual inspection after pressure testing often confirms results, especially when examining high-stress areas like valve pockets where cracks commonly develop. By employing these multiple testing approaches, you’ll achieve a more definitive diagnosis of cylinder head integrity.
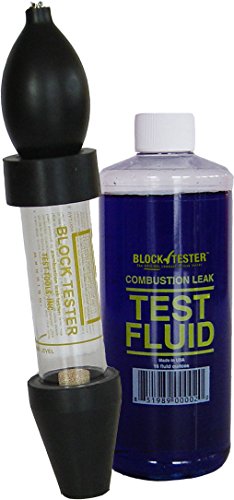
Dye Penetrant Testing Method
Dye penetrant testing offers a reliable, non-destructive method for detecting cracks in cylinder heads that might be invisible to the naked eye. This technique works by revealing surface flaws through the application of special dyes that seep into microscopic openings.
Materials Required for Dye Testing
A complete dye penetrant test kit contains all the essential components needed for effective crack detection. The kit typically includes a colored penetrant dye (often bright red or fluorescent), a developer solution that draws out the dye from cracks, and a specialized cleaner for surface preparation and cleanup. For fluorescent dye kits, a UV light source becomes necessary to illuminate the treated areas. Disposable gloves protect your hands from staining and chemical exposure during the testing process. Clean shop rags or lint-free cloths help with application and removal of the testing materials without contaminating the surface.
Step-by-Step Testing Procedure
Thorough surface cleaning marks the critical first step in dye penetrant testing, as any contaminants can mask potential cracks. Use the cleaner from your kit to remove all traces of oil, grease, dirt, and debris from the cylinder head surface. Apply the penetrant dye generously across the entire suspect area, allowing it to sit for the manufacturer-recommended dwell time (typically 5-30 minutes) to penetrate any existing cracks. After sufficient dwell time, carefully wipe away excess penetrant using the cleaner and clean cloths, leaving only the dye that has seeped into cracks.
Apply the developer evenly over the cleaned surface, creating a thin white layer that acts as a drawing agent for the penetrant. The developer pulls the trapped dye from cracks, making them visible as bright, contrasting lines against the white background. For fluorescent penetrants, examine the surface under UV light in a darkened environment to reveal any fluorescent indications of cracks. Carefully inspect the entire surface for colored lines, dots, or patterns that indicate the presence of cracks - even hairline fractures will appear as distinct colored traces against the developer background.
Document your findings by photographing any discovered cracks before cleaning the cylinder head thoroughly to remove all testing chemicals. Multiple applications might be necessary for comprehensive testing, particularly in complex areas or when initial results appear inconclusive. This testing method proves especially effective for aluminum cylinder heads, where cracks can be extremely difficult to spot through visual inspection alone.
Professional Crack Detection Methods
Professional crack detection methods offer precise, reliable ways to identify cylinder head cracks that might be invisible during basic inspection. These specialized techniques use advanced equipment and scientific principles to detect even hairline fractures.
Magnetic Particle Inspection
Magnetic Particle Inspection, also known as Magnaflux testing, excels at detecting surface and near-surface cracks in ferrous metal cylinder heads. The process begins by applying a magnetic field to the cylinder head, creating magnetic flux lines that flow through the metal. Fine magnetic particles are then spread across the surface, typically in a liquid suspension. These particles gather along disruptions in the magnetic field caused by cracks, forming visible indications that highlight the exact location and shape of fractures. Magnaflux testing proves particularly effective for cast iron cylinder heads, offering clear visibility of cracks around valve seats, combustion chambers, and other critical areas. Mechanics and technicians value this method for its accuracy in detecting minute cracks that could develop into major failures if left unaddressed.
Ultrasonic Testing
Ultrasonic testing detects internal flaws in cylinder heads that other methods might miss entirely. This sophisticated technique sends high-frequency sound waves through the cylinder head material, which bounce back when they encounter discontinuities like cracks or voids. A specialized transducer converts these reflected waves into electrical signals that appear as peaks on a display screen, revealing the presence, size, and location of internal defects. Ultrasonic testing’s main advantage lies in its ability to detect subsurface cracks that don’t break the surface, making it complementary to other testing methods. Though requiring more specialized equipment and training than other techniques, this method provides comprehensive insight into the structural integrity of cylinder heads, especially in critical internal areas not accessible to visual inspection. Technicians interpret the wave patterns to determine if repairs are possible or if replacement is necessary.
When to Repair vs. Replace a Cylinder Head
Deciding whether to repair or replace a cracked cylinder head depends on several factors including the extent of damage, location of cracks, and cost implications. Making the right choice can save you thousands of dollars and prevent future engine problems.
Repair
Minor cracks in non-critical areas of the cylinder head often make good candidates for repair. Smaller fractures can be effectively addressed through welding techniques or specialized repair kits, particularly when the rest of the head remains in good condition. Repairing a cylinder head typically proves more cost-effective than complete replacement, especially for vintage vehicles where original parts are scarce or expensive.
Replace
Major cracks in critical areas demand cylinder head replacement rather than repair. Important fractures between injector tip bores and valves pose severe risks to engine integrity and function. Multiple cracks or extensive damage throughout the head indicate replacement as the safer, more reliable option. Choosing replacement ensures proper engine operation and prevents potentially catastrophic failures that could result from an inadequately repaired head.
Evaluating Crack Severity
Crack severity assessment forms the foundation of the repair vs. replace decision. The location of cracks plays a crucial role in this evaluation - fractures between critical components like combustion chambers, valves, or injector bores represent severe damage requiring replacement. Crack size directly correlates with repair feasibility, as larger cracks typically necessitate replacement while smaller ones may be repairable.
Depth measurement provides essential information about crack severity. Surface-level cracks might be candidates for repair through methods like dye penetrant testing, while deep fractures extending through the casting material usually mandate replacement. Pressure testing reveals whether cracks compromise the head’s sealing ability, with important pressure drops indicating serious issues that repairs might not adequately address.
Cost Considerations
Repair costs vary substantially depending on crack severity and repair method. Minor crack repairs using specialized welding techniques typically range from $200-$500, with labor representing a important portion of this expense. Professional repair services might use metal stitching or stop-drilling techniques that cost less than complete replacement but require specialized equipment and expertise.
Replacement costs include both parts and labor, with new cylinder heads priced between $500-$2,000 depending on vehicle make and model. Installation labor adds $500-$1,000 to the total expense, as the process requires removing and reinstalling multiple engine components. Additional costs often arise from necessary related repairs, including new head gaskets, timing components, and cooling system parts that should be replaced simultaneously.
Long-term reliability factors heavily into the cost equation. Repaired heads sometimes develop problems later, potentially resulting in additional repair expenses or even catastrophic engine failure. Replacement heads, particularly high-quality OEM or performance upgrades, provide greater peace of mind and typically include warranty coverage against manufacturing defects.
Preventing Future Cylinder Head Cracks
After identifying and addressing a cracked cylinder head, taking preventive measures helps avoid recurrence of this costly problem. Proactive maintenance and careful driving habits significantly extend your engine’s lifespan and protect the cylinder head from premature failure.
Proper Engine Maintenance
Regular coolant maintenance forms the foundation of cylinder head protection. Check your coolant level and condition weekly, ensuring it’s clean and at the appropriate level to prevent overheating. Your cooling system components—radiator, water pump, and thermostat—require periodic inspection to confirm they’re functioning correctly and not developing issues that could lead to temperature spikes. Engine oil changes at manufacturer-recommended intervals keep engine components properly lubricated and help manage operating temperatures, reducing thermal stress on your cylinder head.
Avoiding Overheating Issues
Monitoring your temperature gauge while driving provides early warning of potential overheating situations that could crack your cylinder head. Pull over immediately if you notice rising temperatures or steam from the hood, as continuing to drive can cause irreversible damage. Aggressive driving, particularly in hot weather conditions, places excessive thermal stress on engine components and increases the risk of cylinder head failure. Ensure proper airflow around your engine and radiator by keeping these areas clean and free of debris that might restrict cooling efficiency. Address any cooling system leaks promptly, as even minor coolant loss can lead to localized hot spots that gradually weaken the cylinder head’s structural integrity.
Conclusion
Testing for a cracked cylinder head doesn’t have to be intimidating with the right approach. We’ve shared multiple testing methods from simple visual inspections to professional techniques like Magnaflux and ultrasonic testing.
Remember that early detection is crucial to preventing catastrophic engine damage. By watching for warning signs and performing regular maintenance on your cooling system you can avoid most cylinder head issues altogether.
Whether you choose to repair or replace a cracked head will depend on the severity of damage and your budget considerations. The most important takeaway is to address any suspicious symptoms immediately rather than waiting for complete engine failure.
With proper care and vigilance your engine can serve you reliably for years to come.
Frequently Asked Questions
What is a cracked cylinder head?
A cracked cylinder head is a serious engine issue where the component that seals the top of the engine block develops fractures. It’s a crucial part that contains the combustion chamber and passages for coolant and oil. When cracked, it compromises the seal between the engine block and combustion chamber, potentially leading to fluid leaks, overheating, and eventual engine failure if left unrepaired.
What causes a cylinder head to crack?
Overheating is the primary cause of cylinder head cracks, typically resulting from low coolant levels or cooling system failures. Other common causes include improper installation, pre-ignition (engine knock), manufacturing defects, and poor maintenance practices. Thermal stress from rapid temperature changes can also cause cylinder heads to crack, especially in aluminum heads which expand and contract more than cast iron.
What are the signs of a cracked cylinder head?
Look for white or gray exhaust smoke, bubbling in the radiator, milky oil (resembling chocolate milk), unexplained coolant loss, repeated engine overheating, uneven compression readings, and sweet-smelling exhaust. You might also notice decreased engine performance, failed pressure tests, and visible leaks. These symptoms occur because a cracked head allows coolant and combustion gases to mix.
How can I test for a cracked cylinder head at home?
You can perform several DIY tests: Visual inspection with a high-powered flashlight, cooling system pressure testing to reveal leaks, checking for coolant in the oil, and monitoring temperature patterns with a temperature gun. For more thorough testing, consider using dye penetrant test kits or create a homemade pressure tester using an air compressor and pressure gauge.
Is pressure testing effective for finding cylinder head cracks?
Yes, pressure testing is one of the most reliable methods for detecting cracks. It involves pressurizing the cooling system and observing whether pressure holds. A pressure drop indicates a leak, potentially from a cracked head. For best results, combine pressure testing with visual inspection techniques. Most cooling systems should maintain pressure for at least 15 minutes without significant drops.
What is dye penetrant testing?
Dye penetrant testing is a non-destructive method that reveals surface cracks invisible to the naked eye. The process involves cleaning the cylinder head, applying a colored penetrant that seeps into cracks, removing excess penetrant, applying a developer, and then inspecting for colored lines that indicate cracks. It’s particularly effective for aluminum cylinder heads and relatively inexpensive to perform.
What is Magnaflux testing for cylinder heads?
Magnaflux (Magnetic Particle Inspection) is a professional method for detecting surface and near-surface cracks in ferrous metal cylinder heads. It works by creating a magnetic field in the component and applying fine iron particles that gather along crack lines. This technique reveals fractures invisible to the naked eye but is only effective on ferromagnetic materials like cast iron heads, not aluminum.
Can ultrasonic testing detect all cylinder head cracks?
Ultrasonic testing can detect internal and surface cracks by sending high-frequency sound waves through the material. While extremely effective for finding subsurface flaws, it requires specialized equipment and trained operators. It’s particularly valuable for detecting cracks in water jackets and internal passages that other methods might miss, but it’s typically performed by professionals rather than DIYers.
Should I repair or replace a cracked cylinder head?
The decision depends on several factors: crack severity, location, and cost. Minor cracks in non-critical areas may be repairable through welding techniques, while major cracks in combustion chambers or water jackets typically require replacement. Replacement provides greater long-term reliability and often comes with warranty coverage, though it costs more initially ($500-$2,000 plus labor) than repairs ($200-$500).
How can I prevent cylinder head cracks?
Maintain your cooling system by checking coolant levels weekly, using the correct coolant type, and flushing the system according to manufacturer recommendations. Monitor engine temperature regularly and address overheating immediately. Ensure proper airflow around the engine, avoid aggressive driving (especially in hot weather), and follow proper warm-up/cool-down procedures. Regular maintenance and prompt attention to warning signs are your best preventive measures.